Use Android Studio Layout Editor to Make a Login Form Updated FREE
Use Android Studio Layout Editor to Make a Login Form
The Layout Editor enables you to quickly build layouts past dragging UI elements into a visual design editor instead of writing layout XML by hand. The design editor tin preview your layout on different Android devices and versions, and you lot can dynamically resize the layout to be certain information technology works well on different screen sizes.
The Layout Editor is peculiarly powerful when building a layout with ConstraintLayout, a layout manager that's compatible with Android 2.3 (API level nine) and higher.
This page provides an overview of the Layout Editor. To acquire more about layout fundamentals, meet Layouts.
Introduction to the Layout Editor
The Layout Editor appears when yous open an XML layout file.

Figure ane. The Layout Editor
- Palette: Contains various views and view groups that yous can drag into your layout.
- Component Tree: Shows the hierarchy of components in your layout.
- Toolbar: Click these buttons to configure your layout appearance in the editor and change layout attributes.
- Design editor: Edit your layout in Design view, Design view, or both.
- Attributes: Controls for the selected view's attributes.
- View fashion: View your layout in either Code
 , Design
  , or Separate
  modes. Split mode shows both the Lawmaking and Design windows at the same time.
 - Zoom and pan controls: Control the preview size and position inside the editor.
When you open an XML layout file, the design editor opens by default, equally shown in effigy 1. To edit the layout XML in the text editor, click the Code ![]() push button in the acme-right corner of the window. Note that the Palette, Component Tree, and Attributes windows are not available while editing your layout in Lawmaking view.
push button in the acme-right corner of the window. Note that the Palette, Component Tree, and Attributes windows are not available while editing your layout in Lawmaking view.
Tip: You can switch between design and text editors by pressing Alt + Shift + Right/Left arrow (Control + Shift + Correct/Left arrow on Mac).
Modify the preview appearance
The buttons in the top row of the design editor enable you lot to configure the appearance of your layout in the editor.

Figure ii. Buttons in the Layout Editor toolbar that configure the layout advent
Corresponding to the numbers in figure 2, the buttons available are every bit follows:
- Design and blueprint: Select how you'd like to view your layout in the editor. Cull Design to see a rendered preview of your layout. Cull Blueprint to run across only outlines for each view. Choose Design + Blueprint to run into both views side-by-side. You tin can also press
Bto cycle through these view types. - Screen orientation and layout variants: Choose between mural and portrait screen orientation, or choose other screen modes for which your app provides alternative layouts, such as night mode. This bill of fare besides contains commands for creating a new layout variant. You tin can besides press
Oto alter orientation. -
Device type and size: Select the device type (telephone/tablet, Android TV, or Wear OS) and screen configuration (size and density). You can select from several pre-configured device types and your own AVD definitions, or you can create a new AVD past selecting Add Device Definition from the list. Yous can resize the device size by dragging the bottom-right corner of the layout. You can also printing
Dto wheel through the device list. Testing your layout against these Reference Devices will help ensure that your app will calibration well to layout states on real devices.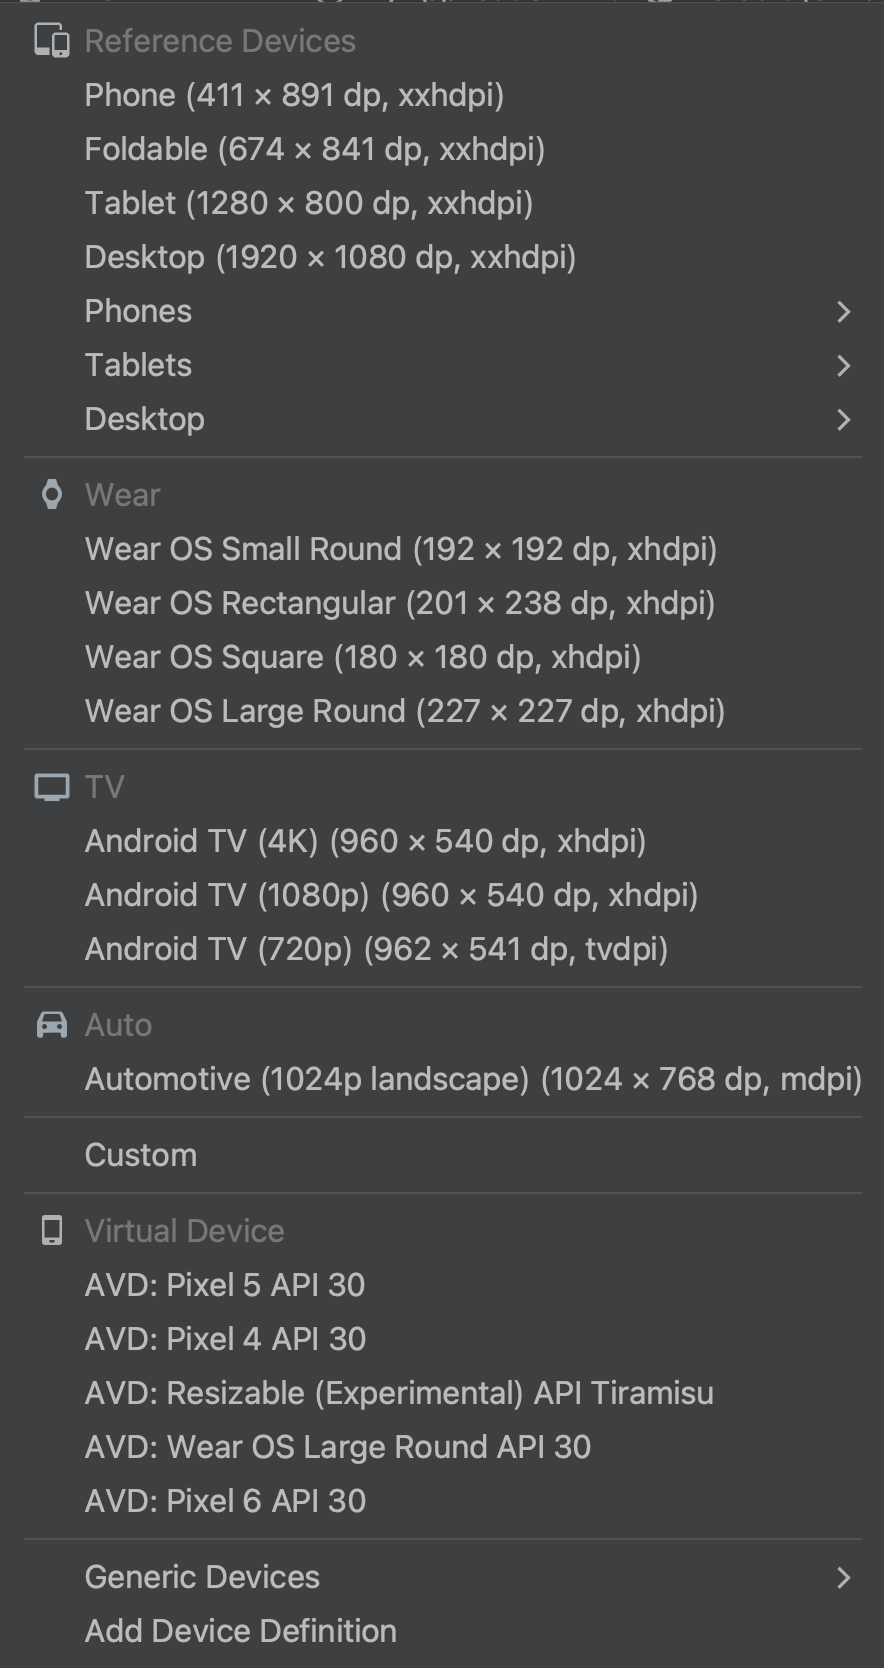
Effigy 3. The device picker carte with Reference Devices.
-
API version: Select the version of Android on which to preview your layout.
-
App theme: Select which UI theme to utilise to the preview. Annotation that this works only for supported layout styles, so many themes in this list result in an error.
-
Linguistic communication: Select the linguistic communication to show for your UI strings. This list displays only the languages bachelor in your string resources. If yous'd like to edit your translations, click Edit Translations from the drop-down carte. For more information on working with translations, see Localize the UI with Translations Editor.
Create a new layout
When adding a new layout for your app, first create a default layout file in your project'south default layout/ directory then that it applies to all device configurations. In one case you have a default layout, you can create layout variations for specific device configurations, such as for large screens.
Yous tin create a new layout in one of the following ways:
- In the Project window, click the module in which you want to add a layout.
- In the main carte du jour, select File > New > XML > Layout XML File.
- In the dialog that appears, provide the file name, the root layout tag, and the source prepare in which the layout belongs.
- Click Finish to create the layout.
Use the Project view
- Choose the Project view from inside the Project window.
- Right-click the layout directory where you'd like to add the layout.
- In the context menu that appears, click New > Layout Resource File.
Employ the Android view
- Cull the Android view from within the Project window.
- Right-click the
layoutbinder. - In the context menu that appears, select New > Layout Resources File.
Use the Resource Director
- In the Resource Manager, select the Layout tab.
- Click the
+button, and then click Layout Resource File.
Use layout variants to optimize for unlike screens
A layout variant is an alternative version of an existing layout that is optimized for a sure screen size or orientation.
Use a suggested layout variant
Android Studio includes common layout variants that you tin utilise in your projection. To utilise a suggested layout variant, do the following:
- Open your original layout file, click the Design icon in the summit-right corner of the window.
- Click Orientation for Preview (
 ) in the toolbar.
 - In the dropdown list, select a suggested variant, such as Create Mural Variant.
Create your ain layout variant
If you'd like to create your own layout variant, do the post-obit:
- Open your original layout file, and click the Pattern icon () in the tiptop-right corner of the window.
- Click Orientation for Preview in the toolbar.
- In the dropdown list, select Create Other....
- In the dialog that appears, define the resource qualifiers for the variant. Select a qualifier from the Bachelor qualifiers list, so click the Add
 button. Repeat this step to add other qualifiers as needed.
 - Once you've added all of your qualifiers, click OK.
When you have multiple variations of the same layout, you can switch betwixt them past clicking Layout Variants and choosing from the listing that appears.
For more than information well-nigh how to create layouts for unlike screens, run into Supporting different screen sizes.
Convert a view or layout
Yous can convert a view to another kind of view, and you can convert a layout to another kind of layout.
- Click the Design push in the top-right corner of the editor window.
- In the Component Tree, right-click the view or layout, and then click Convert view....
- In the dialog that appears, choose the new type of view or layout, and and then click Apply.
Convert a layout to ConstraintLayout
For improved layout performance, you lot should catechumen older layouts to ConstraintLayout. ConstraintLayout uses a constraint-based layout system that enables y'all to build virtually layouts without any nested view groups.
To convert an existing layout to a ConstraintLayout, practise the following:
- Open an existing layout in Android Studio, and click the Pattern push button in the elevation-right corner of the editor window.
- In the Component Tree, right-click the layout, and then click Catechumen
your-layout-typeto ConstraintLayout.
To learn more almost ConstraintLayout, see Build a Responsive UI with ConstraintLayout.
Find items in the Palette
To search for a view or view grouping by name in the Palette, click the Search  button at the top of the palette. Alternatively, you can blazon the name of the item whenever the Palette window has focus.
Yous tin find ofttimes used items in the Mutual category in the Palette. To add an particular to this category, right-click on a view or view group in the Palette, and and so click Favorite in the context bill of fare.
Open documentation from the Palette
To open up the Android Developers reference documentation for a view or view grouping, select the UI element in the Palette and printing Shift + F1.
To view Material Guidelines documentation for a view or view group, right-click the UI element in the Palette and select Material Guidelines from the context card. If no specific entry exists for the item, and then the command opens the home page of the Material Guidelines documentation.
Add views to your layout
To start building your layout, just elevate views and view groups from the Palette into the design editor. Equally you place a view in the layout, the editor displays information virtually the view's relationship with the rest of the layout.
If you are using ConstraintLayout, you can automatically create constraints using the Infer Constraints and Autoconnect features.
Edit view attributes

Effigy 4. The Attributes window
You can edit view attributes from the Attributes window on the right side of the Layout Editor. This window is bachelor only when the blueprint editor is open, so be sure you lot're using either Pattern or Separate manner to view your layout.
When y'all select a view, whether past clicking the view in the Component Tree or in the design editor, the Attributes window shows the following, every bit indicated in figure 4:
- The Alleged Attributes section lists attributes specified in the layout file. To add an aspect, click the Add
 button at the peak correct of the section.
 - The Layout section contains controls for the width and height of the view. If the view is in a
ConstraintLayout, this department also shows constraint bias and lists the constraints that the view uses. For more than information on working withConstraintLayout, see Build a Responsive UI with ConstraintLayout. - The Mutual Attributes section lists common attributes for the selected view. To see all available attributes, expand the All Attributes section at the bottom of the window.
- Click the Search push button to search for a specific view attribute.
- The icons to the right of each aspect value bespeak whether the attribute values are resource references. These indicators are solid
 when the value is a resource reference and empty
  when the value is difficult-coded. These indicators assist you recognize hard-coded values at a glance. Clicking indicators in either land opens the Resource dialog window where you tin can select a resource reference for the corresponding attribute.
 -
A reddish highlight around an attribute value indicates an error with the value. An mistake might indicate an invalid entry for a layout-defining attribute, every bit shown in the red highlight in figure 3.
An orangish highlight indicates a warning for the value. A alert might appear when yous use a hard-coded value where a resource reference is expected, for case.
Add together sample information to your view
Considering many Android layouts rely on runtime data, it can be difficult to visualize the look and feel of a layout while designing your app. In Android Studio 3.ii and later, you can add sample preview information to a TextView, an ImageView, or a RecyclerView from within the Layout Editor.
You tin right-click on one of these view types and choose Gear up Sample Information to brandish the Design-time View Attributes window, as shown in effigy v.

Figure 5. The Design-time View Attributes window
In a TextView, you can choose betwixt unlike sample text categories. When using sample text, Android Studio populates the text aspect of the TextView with your chosen sample data. Note that you lot can choose sample text via the Design-time View Attributes window only if the text attribute is empty.

Effigy 6. A TextView with sample data
In an ImageView, you can cull between different sample images. When yous choose a sample image, Android Studio populates the tools:src attribute of the ImageView (or tools:srcCompat if using the Support Library).

Effigy 7. An ImageView with sample information
In a RecyclerView, yous can choose between a prepare of templates that contain sample images and texts. When using these templates, Android Studio adds a file to your res/layout directory, recycler_view_item.xml, that contains the layout for the sample data. Android Studio also adds metadata to the RecyclerView to properly display the sample data.

Figure eight. A RecyclerView with sample data
Show layout warnings and errors
The Layout Editor notifies you lot of any layout problems next to the corresponding view in the Component Tree by using a blood-red circle exclamation icon  for errors or an orange triangle exclamation icon
  for warnings. Click on the icon to meet more than details.
To see all known bug in a window below the editor, click Show Warnings and Errors ( or ) in the toolbar.
Download fonts and apply them to text
When using Android 8.0 (API level 26) or Android Support Library 26.0.0 or higher, yous can select from hundreds of fonts past following these steps:
- In the Layout Editor, click the Pattern button to view your layout in the design editor.
- Click on a text view.
- In the Attributes window, expand textAppearance, so expand the fontFamily box.
- Ringlet to the bottom of the list and click More Fonts to open up the Resources dialog.
- In the Resources dialog, select a font past browsing the list or by typing into the search bar at the top. If you select a font under Downloadable, then you tin can either click Create downloadable font to load the font at runtime every bit a downloadable font, or click Add font to project to packet the TTF font file in your APK. Note that the fonts listed under Android are provided by the Android system, so they practise not need to be downloaded or bundled in your APK.
- Click OK to terminate.
Use Android Studio Layout Editor to Make a Login Form
DOWNLOAD HERE
Source: https://developer.android.com/studio/write/layout-editor
Posted by: madelynsumbracked.blogspot.com


Comments
Post a Comment